

How To Find A Break In A Wire
I've got to admit, a suspension in the perimeter wire of your robot backyard mower can be frustrating.
It's happened to me a few times over the years. Thankfully, I've picked up some awesome tips which make finding and repairing a damaged perimeter wire really like shooting fish in a barrel, and actually a bit of fun!
Although the perimeter wire for robotic lawn mowers is fairly robust, it is not immune to damage. Breaks in the loop wire are usually the result of unintentional physical damage to the wire such as when gardening. In countries with footing frost, abrupt stones that motility in the ground due to freeze-thaw conditions can damage the wire, particularly if the wire has been stretched excessively during installation.
It is possible for the mower itself to damage the wire if not installed properly, or for pets or burrowing animals such equally rabbits and moles to harm the boundary wire.
Thankfully, breaks in the boundary wire do non happen very oftentimes, just is an issue that really concerned me when I start installed my robot lawn mower, as I thought it could result in me having to rip up large sections to boundary wire to discover and repair the error.
The skillful news: There's a few elementary techniques that can be used to help yous to find a break in the perimeter wire and easily repair it. I am going to explicate how to make finding the intermission and repairing the wire a pain free process.
What To Do Offset
If y'all discover that your mower is non working and realize that the perimeter wire betoken is the problem, the first thing you lot should exercise is to cheque that the boundary wire connections to the charging station. Information technology is possible that one of these has come loose or has been damaged. Once you have tried this, check to see if this has solved the problem.
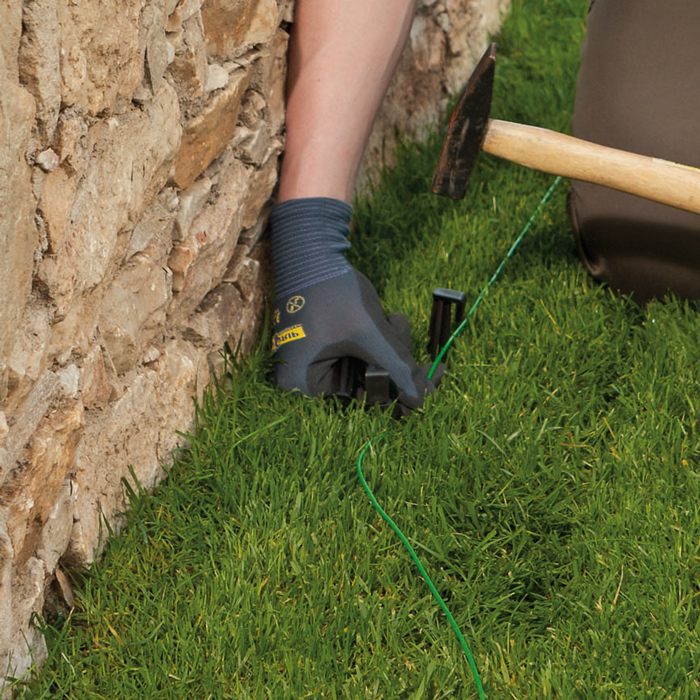
The adjacent step, regardless of whether you have chosen to bury the boundary wire or simply peg it to the grass, is to walk around the perimeter of the grass, looking for any sign of exposed wire, or disturbance to the grass or soil, which may have led to damage to the wire.
I had ane early on break in my boundary wire at a time when I had the wire pegged to the basis. I had set the boundary wire too close to a flower bed and the mower toppled into the bloom bed. This tilted the cutting blades, which came into contact with the ground and the boundary wire, resulting in a break.
Thankfully on this occasion, the wire was recently installed, the grass had non yet grown over the top of it, and locating the interruption was easily done as two ends of broken wire were poking up out of the footing.
However, if you accept done a loop of your garden and cannot locate a break, what do yous practise next. Is this the time to start excavation, or pulling wire up, starting at the charging station.
The short answer is no! There are a few options to help you detect the broken wire, but I am going to tell you almost the best 1 first.
Option One – The Like shooting fish in a barrel Way – This Method Isn't In Any Robot Lawn Mower Manual!
I was amazed to discover that yous can use a portable AM radio to locate the location of a intermission in the perimeter wire. The reason for this is that a functioning perimeter wire will cause short range interference to an AM radio point, so you tin can literally walk around your garden, with a portable AM radio and follow the sound of the interference until it stops, locating the break. If you don't have i, y'all can pick ane upward on amazon for side by side to nix.

The steps involved in this are as follows;
1. Tune an AM radio to approximately 700khz, ensuring that there is no station tuned to this frequency, but static.
ii. Disconnect one finish of the boundary wire from the charging station, then there is only electric current running through one end of it. This will mean that the function of the wire after the interruption will produce no interference, but the office of the wire before the break will brand a repetitive beeping.
three. Follow the path of the boundary wire effectually the perimeter of your backyard, listening advisedly for the AM radio interference point. When you motility away from the wire, the signal will fade or stop. This will aid you lot to stay directly over where the perimeter wire is.
4. Once you reach the indicate of the interruption, the betoken volition fade and stop very speedily, which volition enable you to pinpoint the position of the break. If the perimeter wire is pegged to the ground, it will simply be a matter of digging down with your fingers until you find the wire and locate the break. If the wire is buried, you will and then just have to dig a small section of grass to locate the broken wire.
Option 2 – The Manufacturer's Recommended Method
This is the choice recommended by most manufacturers. If is more complicated and time consuming, but will work well.
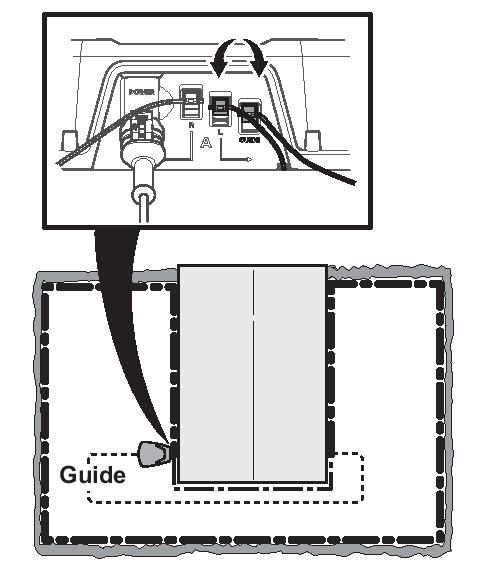
The first step is to switch the connections betwixt the guide wire and the purlieus wire in the charging station.
This will allow you lot to see which section of the purlieus wire contains the mistake.
If on switching the connector for the guide wire and the boundary wire, the error message for the purlieus wire is gone, then you lot know that this department of the boundary wire is intact, and the mistake must lie in the other section of the boundary wire.
If the suspected purlieus wire is brusk then it is easiest to exchange all of the boundary wire in the identified section. If the fault lies in a long section of boundary wire, then information technology would potentially take a long time to pull or dig up all of this wire to identify the fault and then peg it downward or coffin it again.
It wouldn't be a job I would look forward to.
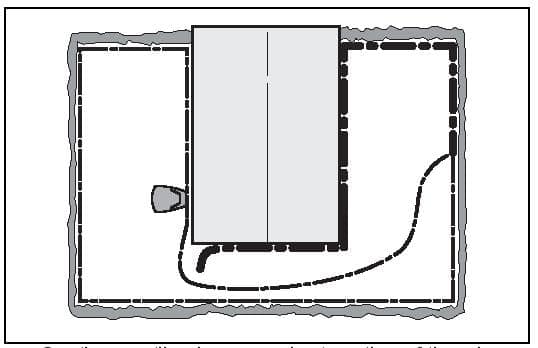
One way to make this slightly easier is to run a department of purlieus wire from the charging station to the mid point of the section of boundary wire where the mistake lies.
This volition involve using a new slice of purlieus wire. You should connect i end to the terminal on the charging station for the section of purlieus wire where you lot have identified the problem. You will need to adhere the other end of the wire to the purlieus wire at approximately the mid signal of the problem section.
To exercise this, you will need to cut the purlieus wire and employ a connector to link the new section of wire and the existing boundary wire.
The diagram below is from the manual of my robot backyard mower and explains the idea. Basically, it halves the section of wire where the problem lies.
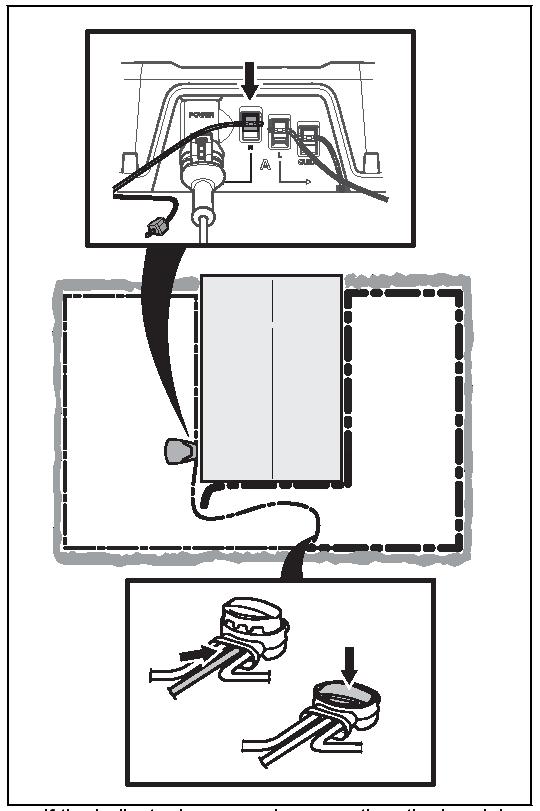
One time you have connected up this shorter loop, you lot should check the control panel of the robot mower to encounter if the mistake for the missing boundary wire signal has disappeared. If so, you know that the pause lies in the other section of wire. If not, then the break lies in the section of wire you are testing.
You can and so echo this procedure with the new shorter section of wire that has been identified to take the fault in information technology.
Manifestly, this process is time consuming and involves intentionally cutting your boundary wire at several points.
Fortunately, it is very quick and piece of cake to utilise the spare connectors, and spares tin be purchased cheaply. The connector and exposed boundary wire can be buried, and then there will be no visible evidence of the work you have washed to the boundary wire. The process for connecting purlieus wire with connectors is very simple.
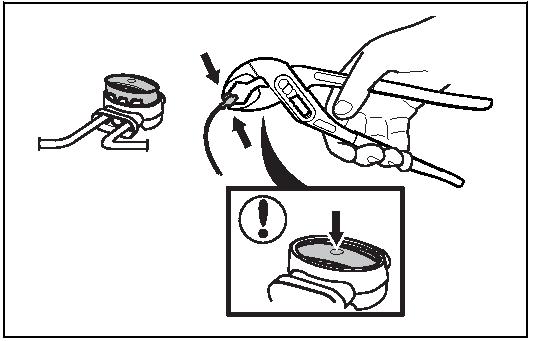
At that place are some differences between connectors for unlike manufacturers, merely the principle is exactly the same. Yous just accept a new connector and insert the boundary wire in each of the holes in the connector. It does non matter which holes are used for each stop of the purlieus wire.
Bank check that the wires are fully inserted into the connector and then that the ends are visible through the transparent area on the other side of the connector.
Use a polygrip or a pair of pliers to completely press down the button on the connector.
In my opinion, I feel that the manufacturer recommended method for identifying the break in the boundary wire is excessively complicated and time consuming. I would strongly recommend using the AM radio method. Yous tin can purchase a portable AM/FM radio online or in a local shop for near the same toll every bit a few spare connectors.
After a quick search of Amazon, I plant suitable radios for less than £10/$xv, which would let me pinpoint the break. Not only would this barely cost more than the official repair method, but it is really quick to do, so the time saving is well worth it in my opinion. There are a number of videos on Youtube which tin also prove you the exact method for using the AM radio method.
Preventing Breaks In The Outset Place
Whatever style you lot wait at it, a damaged of broken perimeter wire is abrasive, and avoiding it in the commencement place is past far the more preferable option. You don't desire to exist in a situation where your boundary wire is littered with connectors due to repair activity.
Each of these connectors could potentially be a bespeak of failure for your perimeter wire, increasing the risk of perimeter wire problems in the futurity. At that place are a few elementary measures which you can take to reduce the risk of perimeter wire problems.
Ensure A little Slack Is Left In The Wire When Installing The Wire
If the perimeter wire is under tension when it is installed, or develops tension equally a upshot of movement in the ground over fourth dimension, it increases the chance of failure at any weak points in the wire.
Precipitous stones, or connectors could go points where the wire will fail. Freeze-thaw conditions over the wintertime tin can outcome in quite a lot of motion of stones in the soil, and if one is pressing confronting the perimeter wire, it tin lead to a break over fourth dimension.
The remedy for this is to leave just a little slack when y'all are installing the perimeter wire. If yous are burying the perimeter wire, this is very unproblematic to do. If yous are pegging the wire down, you will nevertheless need to ensure that the wire sits flush with the footing, to forestall the mower from cutting a scrap of exposed wire, merely information technology will also enable the grass to grow over the top of the wire quicker.
Although y'all want to leave a lilliputian slack, you should not exit a redundant loop or curl of wire along the path of the perimeter wire equally this can interfere with the functioning of the mower.
Get out The Cutting Height High At First
Afterwards you first install the perimeter wire and get your new mower upwards and running, the temptation is to gear up the cutting blades to your desired tiptop and start enjoying a perfectly cut lawn. This is non appropriate, as it is very common in the first few weeks of operation for there to be a piece of boundary wire which is sitting upwardly from the grass, or gets pushed up over time by the growing grass.
You should prepare your mower to the highest cutting setting and slowly reduce the height to the desired level over the infinite of a few weeks, while periodically walking around the perimeter of the grass to identify any sections of purlieus wire which do non remain affluent with the ground.
This is more than relevant for perimeter wire which is pegged to the ground, but fifty-fifty shallowly buried perimeter wire tin sometimes elevation upwards from below the soil in the first few weeks. Afterwards a few months, the grass will grow over the top of the perimeter wire and you will not encounter it at all and should not have any issues.
Ensure Yous Lay The Perimeter Wire At The Recommended Distance From The Edge Of The Lawn
I read the teaching manual of my robot lawn mower advisedly before installation, but so thought I knew meliorate, and installed my perimeter wire a little closer to the edge of flower beds in my garden. I did this to try to avoid any strips of grass from being left uncut by the robot lawn mower.
Unfortunately, this led to my mower falling into my bloom beds on a regular basis when first installed. As it tilted at a slight angle when getting stuck in the bloom beds, it would often issue in the cutting blades coming into contact with the ground. There were two occasions when the blades came into contact with my boundary wire.
On ane occasion, the wire was cutting, and on another occasion, it was slightly damaged, but still worked without result.
I learned my lesson, and afterward re-sited the boundary wire at the correct distances from the edge of the backyard.
In fact, I initially pegged my boundary wire down, but following these incidents, I buried the purlieus wire. This wasn't really that much more than time consuming that pegging information technology down, as I simply used an edging tool to create a narrow slit in the grass, in which I inserted the boundary wire.
Thankfully, I have had no bug since. I would strongly recommend following the instructions in the manual of your robot lawn mower exactly, to avoid like problems.
Ensure You Keep Some Spare Perimeter Wire And Connectors For Your Robot Lawn Mower
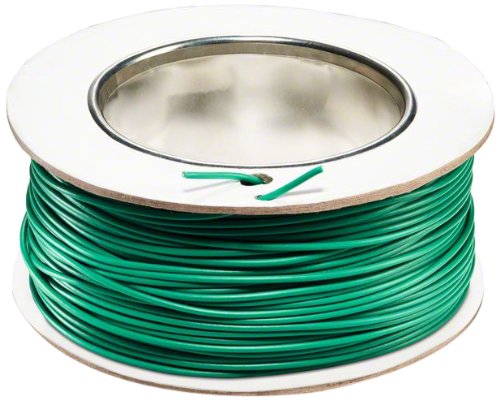
If the worst should happen, and your perimeter wire gets cut or damaged by something, it is really frustrating to have to look for a delivery of new perimeter wire or connectors to fix the trouble. Most robot lawn mowers come with a pocket-size number of spare wire connectors and manufacturers ordinarily provide plenty perimeter wire to have a little left over.
At that place are a few exceptions. If your backyard is a very unusual shape, or has a lot of obstacles within the body of the backyard that demand to be marked out, y'all may need to do a quick check to make sure yous take plenty wire before you start the installation procedure.
All the different robot backyard mower manufacturers will provide their own wire and connectors, but often there is no departure between them other than the packaging. Manufacturer branded spares tend to be a lot more expensive than perfectly acceptable generic alternatives.
Afterwards I got my current robot lawn mower model, I bought a multi-pack of compatible connectors and spare blades off Amazon and a spare pack of wire. It saved me a lot of coin compared to the official spares. This means if I take a break or if I desire to motion the purlieus for my robot backyard mower, then I have plenty of spares to make this an easy process.
What Nigh Getting A Robot Lawn Mower That Doesn't Need Perimeter Wire?
This would be dandy, but unfortunately there are no good options yet for robot backyard mowers that don't require perimeter wire.
The edge detection technology is getting amend with every new model that is released, and I've no doubt that perimeter wire will be a thing of the past in a few years, but for now, perimeter wire is the best option. I've written an commodity all about robot backyard mowers without perimeter wire here.
Hopefully you don't have to worry about boundary wire problems too often when using your robot lawn mower, simply if you do, I hope this data has been useful. Let me know in the comments section virtually your experiences with damaged perimeter wire. If you have any questions about robot backyard mower perimeter wire, I'd be glad to attempt to answer them.
Related posts:
Source: https://myrobotmower.com/how-to-find-and-repair-perimeter-wire-of-your-robot-mower/
Posted by: fileralcull.blogspot.com
0 Response to "How To Find A Break In A Wire"
Post a Comment